Excerpts
How to avoid injuries while bodybuilding
Here are the first eight of Chapter One’s 38 recommendations on how to avoid injuries while bodybuilding:
1. Never apply the “No pain, no gain” maxim
Never do anything that hurts, don’t train if you’ve hurt yourself, and never train through pain. Cumulative muscular discomfort and systemic fatigue from an exercise done with effort and correct technique, are desirable, but pain isn’t. Any sharp, stabbing, or sudden pain is a sign you’ve injured yourself.
Countless trainees have given up bodybuilding and strength training because of having been hurt from following foolish advice. Those who live the “No pain, no gain” maxim usually regret it, sooner or later.
2. Know your physical anomalies
Modify your training according to any physical anomalies you may have. For example, if you’ve had back surgery, the barbell squat may be an unwise exercise selection; and if you have foot problems, running wouldn’t be a wise choice of cardio exercise. Know your body before you go training it.
3. Seek correction of physical restrictions
With the right treatment you may be able to rid yourself of problems you may have accepted as permanent, or at least reduce them greatly. Investigate the possibility. You probably have restrictions in your muscles — soft-tissue restrictions are at the root of many physical problems and limitations. Seek expert therapists. You may need to look beyond your home area.
4. Don’t neglect flexibility work
Generally, supple muscles are less likely to suffer injury than tight ones. Supple muscles have more give in them than tight muscles, and help protect against injury. Supple and strong muscles provide greater protection.
5. Adapt to exercises
Be patient when learning how to perform a new exercise. Use very light weights to begin with, and only once you’ve mastered exercise technique should you add weight, gradually, and pick up the effort level.
Once you’ve had a lot of experience with a particular exercise but haven’t included it in your program for a few months, take a few weeks to refamiliarize yourself with it before you train it hard.
6. Apply training discipline
It’s easier to use correct exercise technique and controlled rep speed at the start of a set than during the final few reps when the required effort is higher. Hold correct technique and controlled rep speed even on the final “can just squeeze this out” rep. Never break correct form to force out another rep. Perform correct reps only, or end the set.
If possible, train with a partner who can scrutinize your exercise technique and rep speed, and, by oral cues, help you to keep your technique and rep speed correct.
7. Use a safe range of motion
Use the maximum safe range of motion for you for each exercise. For selectorized equipment, such as many leg curl machines, you can manually delimit the range of motion, if required. Remove the pin from the weight stack, then grip the cable that’s attached to the guide rod that runs through the weight stack, and lift it. The top weight plate will rise alone, revealing the guide rod. Expose two holes on the rod, for example, and then use the pin to select the required weight. The gap between the first and second weight plates indicates the reduction in range of motion — two to three inches in this illustration. Fine-tune the reduction to what’s required to produce the maximum safe range of motion for you. Make a note in your training logbook of the setting.
8. Maintain symmetrical lifting
Other than for one-side-at-a-time exercises such as the one-legged calf raise, and the L-fly, focus on symmetrical technique, to apply symmetrical stress to your body.
Don’t let the bar slope to one side during barbell work. Keep it parallel with the floor at all times. Both hands must move in unison. For example, in barbell pressing, one hand should neither be above nor in front of the other.
A critical factor behind symmetrical lifting, is symmetrical hand and foot positioning. If one hand is placed further from the center of the bar than the other, or if one foot is positioned differently to the other, you won’t be symmetrically positioned, and thus will be set up for asymmetrical lifting.
Load barbells carefully. If you loaded one end of the bar with more weight than the other, you’ll lift asymmetrically. A substantial weight difference will be noticeable during the first rep of a set, whereupon the bar should be set down or racked, and the loading corrected. A bar that’s slightly lopsided may not be detectable, but will nevertheless lead to asymmetrical lifting, and perhaps injury.
If you lift on a surface that’s not horizontal, you’ll lift asymmetrically. Train on a level floor. This is especially important for the big exercises, such as the squat, deadlift, overhead press, and bench press. Take a spirit level to the gym, and check out whether or not the lifting areas are level, and then use only the ones that are.
Bench press technique
When it’s done safely and effectively, the bench press is one of the best bodybuilding exercises.
Bench press set-up
The bench press is done supine, lying on your back on a horizontal bench. Use a straight barbell, not one with bends or cambers in it. Bench press inside a four-post power rack with pins and saddles correctly positioned, and securely in place.
Alternatively, bench press between sturdy squat stands together with spotter (or safety) bars or racks, or use a half rack, or use a combination bench-and-weight-stands unit together with spotter bars. Some bench-and-stands units have built-in, adjustable spotter bars. Set the safety bars at the appropriate height, and position yourself on the bench so you won’t miss the safety bars if you need to set the barbell on them.
If there are no spotter or safety bars to stop the bar getting stuck on your chest if you fail on a rep, you must have an alert and strong spotter in attendance.
Center a sturdy, stable bench between the weight supports. In a power rack, if possible, mark where the bench should be, to be centered. Use a tape measure to ensure correct centering. The rack and bench should be level — have them checked, and corrected if necessary.
Depending on the bench press unit you use, the bar saddles may be adjustable. Position them neither too high, nor too low.
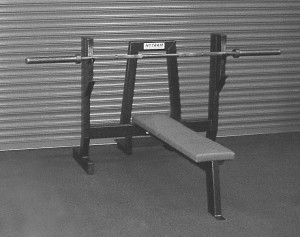
A combination bench-and-weight-stands unit, but without spotter bars. An assistant must be used as a spotter with this type of unit. There’s a raised platform here for the spotter to stand on, for easier handling of the barbell by the spotter. An unloaded barbell is shown resting across the unit’s upper bar saddles.
Positioning for the bench press
Position yourself on the bench so that you won’t hit the uprights of the rack or stands with the bar during the bench press ascent, but also so that you minimize the horizontal movement of the bar during the unracking and racking of the bar. The bar, when racked, may, for example, be directly above your nose. The set-up varies according to individual body structure, height of the bar holders, and depth of the saddles. Experiment with a bare bar, to find what works best for you. Make a note of where your eyes are, relative to the bar, when you’re on the bench with the bar in the saddles, ready to unrack the bar to start a set.
Lie on the bench with your feet, hips, back, and head all in position. Your heels should be on an imaginary vertical line drawn from your knees, or slightly in front of it. If your heels are behind this line (that is, pulled toward your pelvis) that will lead to exaggerated arching of your lower back. Avoid that. Although some arching in the lower back is normal, don’t exaggerate it. Some trainees exaggerate the arch, to raise their chests as much as possible in order to reduce the distance the bar has to move before it touches their chests, to increase the weights they use. That technique has injured many trainees.
Establish a strong base, with your feet flat on the floor wider than shoulder width. Don’t place your feet close together on the floor, and don’t place them on the bench in any manner — both placements would reduce your stability. Never lift your heels off the floor during the bench press. If you have short lower limbs and can’t keep your feet flat on the floor, raise your feet a few inches using low blocks, or plates stacked smooth side up.
Set the rack’s pins, or whatever safety bars you use, an inch below the height of your inflated chest when you’re in position on the bench. A length of hose or tubing may be put over each safety bar, to soften contact with the barbell. If you fail on a rep, lower the bar to your chest, exhale, and set the bar on the supports.
Bench press grip
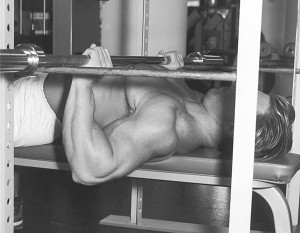
While the bar is at the line of your lower pecs, your hand spacing should put your forearms in a vertical position when viewed (by an assistant) from the side and from your feet. Your elbows should be directly under your wrists. Adult men should use a grip with 21 inches or 53 centimeters between their index fingers as a starting point. Women should use a grip four inches or ten centimeters narrower. Fine-tune from there to find the grip that gives you the proper forearm and elbow positioning. Once you find your optimum grip, have someone measure the distance between your index fingers, and make a written note of it.
Don’t use a thumbless grip, because it reduces control over the bar. Wrap your thumbs under and around the bar.
Grip with your hands equidistant from the bar’s center. Be sure you’re not even a fraction of an inch off center. Before a set, know precisely where your hands should be — use a tape measure if necessary.
If the back of your hands, wrists and forearms is in a straight line during the bench press (or any other type of pressing movement), the bar will fall out of your hands. Your hands must move rearward sufficiently so that you can hold the bar securely. But don’t allow the bar to extend your hands to the maximum, because that can severely mar your lifting technique, and injure your wrists. (The bar should be gripped firmly, because the slacker your grip, the less the actions of the flexors on the palm side of your forearm, which translates to less muscular counteraction to the rearward bending.) Once the bar is in a secure position in your hands, keep your wrists rigid for the duration of each set.
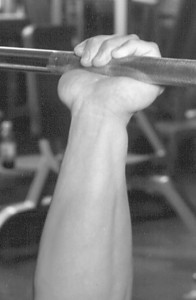
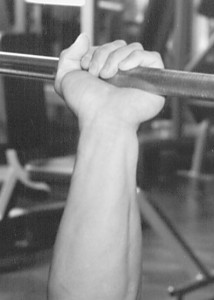
The thumbless or false grip on the left, and the correct grip on the right.
Performance of the bench press
Get in position on the bench, hands in place on the bar, with a spotter or training partner standing directly behind you. Have the spotter or training partner give you a hand-off as you fully straighten and lock out your elbows. Pause until the bar is steady above your chest, inhale fully to fill your chest, pull your shoulders back, then immediately lower the bar under control. The full inhalation, and pulling back of the shoulders, help to produce the required tight, full torso. Take at least two to three seconds for the descent.
Lower the bar to a point below your nipples, at about the bottom line of your pectoral muscles. Find the precise point that’s best for you. When the bar is on your chest, your forearms should be vertical when viewed from the side and the front (or rear, depending on where the viewer is). If they aren’t, your hand spacing is incorrect.
Never bounce the bar off your chest. Touch your chest with the bar, pause there for one second, then push it up. Stay tight at the bottom with a full chest and firm grip — don’t relax.
The ascent of the bar should be vertical, or slightly diagonal if that feels more natural — with just three or four inches of horizontal movement toward your head. Try both, and see which works best for you. Keep your forearms as vertical as possible during the ascent. Do this through keeping your elbows directly beneath your wrists. Exhale during the ascent.
Check yourself on a video recording, or have someone watch you from the side. What you may think, for example, is a vertical movement, may be angled toward your feet. Practice until you can keep the bar moving correctly.
The ascent, just like the descent, should be symmetrical. The bar shouldn’t tip to one side, both hands should move in unison, and you shouldn’t take more weight on one side of your body than the other.
After locking out the bar, pause for a second or until the bar is stationary, inhale fully, pull your shoulders back, then again lower the bar slowly to the correct position on your lower chest.
On your final rep, lock out your elbows normally above your chest, then return the bar to the saddles. Never push directly into the saddles on your final rep.
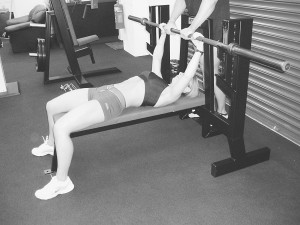
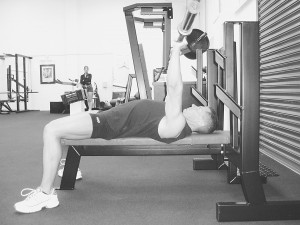
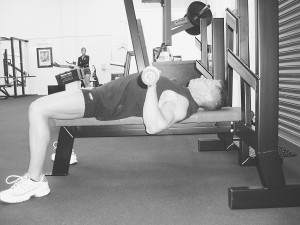
The hand-off to start a bench press set (top), the top
position prior to the descent of a rep (middle), and the
bottom position at the lower pectoral line (above).
Common errors in the bench press
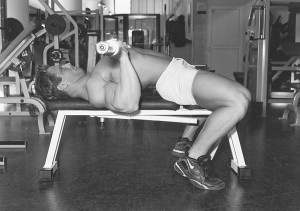
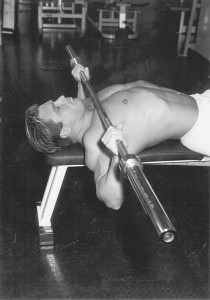
Two of the most common bench pressing errors. Top, exaggeration of the arch in the lower back — from having the feet behind the knees, and from not keeping the feet flat on the floor. never do that. It has injured the lower backs of many trainees. Bottom, bench pressing to the upper chest. never do that. It has injured the shoulders of many trainees.
Other tips for the bench press
Keep your head flat on the bench. Never turn your head while you’re lifting or lowering the bar. If you do, the bar may tip, and then your groove would be marred, and you could injure yourself.
Don’t drive your head back into the bench, or otherwise you’ll risk injury to your neck.
Use chalk or rosin on your hands to improve your grip on the bar, but keep the knurling clean.
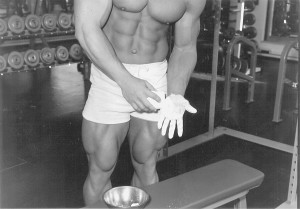
When applying chalk, cover each hand, including the area on the inside of your thumb and index finger.
Once you’ve learned correct technique in the bench press, drill yourself on a fixed set-up and approach-to-the-bar procedure. And give 100% attention to ensure that you deliver correct technique on every rep. Even a slight slip of concentration can lead to lowering the bar slightly out of position, or having one hand out of step with the other. Either of these will ruin your groove. This will make the weight feel heavier, make your reps harder, and risk injury.
Spotting for the bench press
A hand-off to get the bar out of the saddles to start the set, is the first function of a spotter. During a set, as soon as the bar stalls or tips, or one hand gets forward of the other, the spotter must act to prevent the rep deteriorating further and causing injury.
The spotter must use both hands and provide sufficient assistance to keep the bar horizontal and moving correctly, centered above the lifter.
Even if the spotter doesn’t need to assist during a rep, he should guide the bar back into the weight saddles after the final rep. At the end of a hard set of bench presses, you’ll be tired. Without a guiding pair of hands on the bar from a spotter, you may miss getting the bar into the weight saddles. Throughout spotting, the spotter must not round his back, to protect his back.
